Getting Started with React Native
Mobile application development with React Native

I’m a developer from Nigeria
Introduction
React Native is a JavaScript framework that is built on the same fundamentals of ReactJS. This means that we will need to start a local front-end server for us to see the changes being made live to our mobile application. This process is also known as Hot Reloading.
There are 2 ways of developing with React Native. In the industry, developers in software companies will use the first method which is “bare” development. This means that they will have total control over the entire application. However, this method will require developers to acquire developer accounts with Google or Apple. The second method is known as the “Expo” development method which allows us to view our code changes live using the Expo Go mobile application. This method comes with some restrictions like the inability to run native code-level features like augmented reality and speech recognition. If you would like to explore those features, you will need to use the “bare” development method. For most mobile applications, this method is sufficient and in this campaign, we will be using the “Expo” development method.
In this quest, we will be setting up our environment to prepare ourselves for mobile development. We will need to install 3 items:
NodeJS: For installation of JavaScript modules
Expo CLI: For local development server
Expo Go: To view live changes
Learning Outcomes
By the end of this quest, you will be able to:
Install the necessary tools needed for React Native development
Run a local server with Expo
Have a high level understanding of React Native development by learning the setting up process
Step 2: Installation of NodeJS
You may skip this step if you already have NodeJS installed on your device. To check if it is installed, you can run node -v in your terminal.
In this step, we will be installing the tools we need for React. Firstly, we need to install a JavaScript Package manager called NodeJS. This will allow us to install Expo CLI Tools onto our machine. Head here to install NodeJS onto your machine.
On the page, download the installer for your machine’s operating system. Once you have opened the installer, follow the on-screen steps to safely install the file onto your machine. NodeJS will then install some packages for you to install dependencies for any JavaScript project you may have. Dependencies are external packages written by other programmers for us to use in our own project. These dependencies are stored in NodeJS and each time we can just install them into our project without having to write them on our own.
Step 3: Expo Tool CLI
We are almost done with setting up our environment for React Native. We will need to install the final component, which is the Expo CLI Tools. Before we start developing our React Native Project, create a new folder within your machine and name it react-login-app. This folder will be the root directory for your first React Native App. Open Visual Studio Code (or any other code editor of your choice), open the folder you just created and open the built-in terminal. Enter the following commands one by one for React Native to populate your directory with the templates and other essential tools needed for your React project. npm install expo-cli -g npx expo init login-app
The first line of the command is to download the Expo CLI tool into our local machine and the next command is to generate the React Native boilerplate. Expo will create a new folder called login-app in this case.
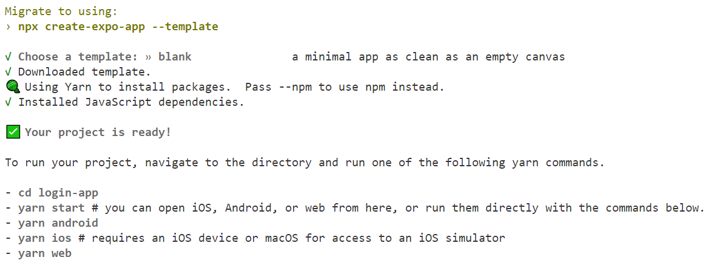
When prompted for creating the type of React Native Project, use your keyboard arrows to select “blank” and press “ENTER/RETURN” on your keyboard. If successful, your terminal should have an output that says "Your project is ready!".
Next, we need to change the directory to the folder 'login-app', using this command.cd login-app
Lastly, we will spin up the local development server by running the command below. Do note that your local development server will need to be running in the background for you to see changes in your browser.expo start
For now, you should see a your code editor similar to the 'expected output'. We have finally completed the setup of our React Native Project!
Expected output

Step 4: Expo Go
Next, you will need to use your smartphone to install the Expo Go application from the App Store (iOS) or Play Store (Android).
Ensure that your smartphone is connected to the same WiFi network as your local machine, so that the Expo Go app can connect to your local server. This is one way of connecting Expo Go to your local machine. Another way is called tunnelling, which requires a physical wire.
On Android, you should see an option for 'Scan QR code' and scan the QR Code in your terminal. On iOS, use the built-in QR code scanner of the Camera app and you will redirected to the Expo Go app. The Expo app is now connected to your local machine and your app should show you a display similar to the 'expected output'.

Expected output